Authentication: Other Scenarios
Authentication: Other Scenarios
By default, Enfold Server/Plone uses cookie-based authentication for all users. But it also offers advanced features for various authentication situations.
To do this, login to the Plone web site as the Zope user (or someone with the manager role). Click Site Setup on the top right corner of the page. (If it doesn't appear, you don't have administrator/manager privileges). Next, select Authentication Profiles. (See how to choose the right authentication profile).
One of the most powerful features of Enfold Server is to take user data from Active Directory (AD) and enable automatic login for domain users. (See Windows single sign on).
But your particular situation may be unique or may not require such an elaborate way to handle authentication. Enfold Server and Plone offer enough flexibility to handle most circumstances while avoiding the security pitfalls that plague other web development platforms. A number of these setups are not explicitly supported by Enfold, but in some cases, setup is straightforward.
Creating Simple Users and Groups (Without Active Directory)
It is not required to use Active Directory or LDAP to manage users and groups on Enfold Server. In fact, if you use the Default Plone with Cookie Authentication authentication profile, you can do user management completely from Plone Site Setup. (See how to choose the right authentication profile).
Plone already includes a way to create users and groups from the Plone Site Setup. To access Site Setup (also called the Plone Control Panel), log in as the Zope user and click on the Site Setup hyperlink on the top right. Next, click on the link to Users and Groups (the URL will look like this: http://localhost:8080/Plone/prefs_users_overview). You may also have to assign users to workflow roles in Plone. (Read more about Plone user roles).
This solution can be effective for smaller websites or for small companies. It uses cookie-based authentication (see Default Plone with Cookie Authentication). Accounts need to be created manually by a Zope admin (so this solution may not scale well), but you still can set up robust security and sharing.
Note the Zope Administrator can create users by this method. However, these accounts will not be active until the person associated with this account receives the email and clicks on the URL included in the URL to activate the account.
See also: the Plone how-to on Setting up a Plone 3 site with public and restricted content at plone.org.
Adding users in Enfold Server
To add users in Enfold Server:
- In the top-right corner is the list of site actions. Click site setup.
- Under Plone Configuration, click Users and Groups Administration.
- Under Users Overview, click add new user.
- Fill in the information and click Register.
- Repeat steps 3 and 4 for each additional user.
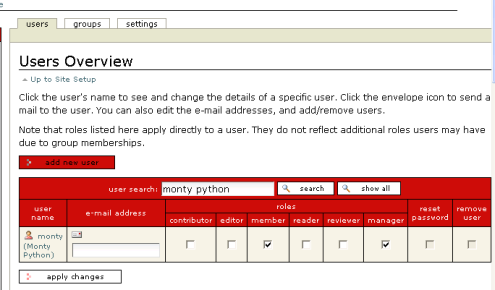
Assigning Roles in Enfold Server
To assign roles to users in Enfold Server:
- In the top-right corner is the list of site actions. Click site setup.
- Under Plone Configuration, click Users and Groups Administration.
- Under Users Overview, click show all.
- Click the checkboxes to apply roles to users, then click apply changes.
Setting Up Self-Registration
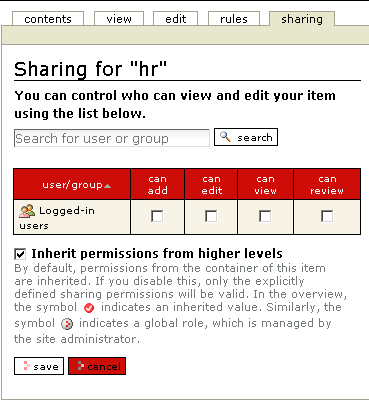
Often Plone is chosen for the sophisticated security and workflow. In an Intranet environment, self-registration may not appropriate when user data is being stored more systematically. However, there are occasions when self-registration is necessary and appropriate. For example, maybe the Administrator wants users to be able to create accounts for commenting on articles. Or perhaps a company needs to set up an event wiki (using the new wiki capabilities present in Plone 3.x) and individual users may wish to make changes. For situations like this, the user may be allowed to self-register and receive rights to add content to a particular directory. To do this, an Administrator will need to go to the directory in question (such as the hrpolicies directory located at http://www.mywebsite.com/hrpolicies), click on the sharing tab and select the right role (or check the box to inherit permissions from a higher directory).
LDAP for user authentication
Instead of Active Directory and the Windows Security options, you can also authenticate users against LDAP.
LDAP (short for Lightweight Directory Access Protocol) is a general protocol for communicating with directory services. Active Directory supports LDAP, but when we speak of LDAP separately, that usually refers to a directory service (perhaps an open source one) that is able to provide directory information when queried. Active Directory is simply Microsoft's implementation of LDAP in a Windows environment. LDAP has been implemented not only on Windows, but also Unix environments.
Plone has built in support for the LDAP protocol (using LDAPUserFolder), and Enfold includes two authentication profiles for using LDAP-supported applications. Keep in mind these things.
- LDAP uses cookie-based authentication (and not NTLM authentication, which is specific to Active Directory). So using an LDAP authentication profile won't have automatic login for Windows domain users.
- You must enter LDAP settings manually through the ZMI to make it work.
- Because LDAP is a general standard (and many applications implement this standard differently), Enfold does not directly support using third party LDAP applications with ES.
Better information about LDAP can be found on Plone.org's documentation and mailing lists.
Here are the basic steps for establishing a connection between an LDAP server and Plone.
Select authentication profile for LDAP. (See Authentication Profiles). Press Update.
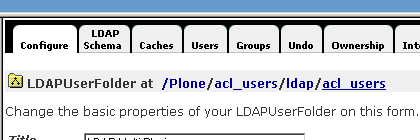
A Configuration hyperlink will now appear under the profile you chose. Select it.
The Zope Management Interface (ZMI) will now open to a context where you can add/configure an LDAP server. From your Plone site, you would need to go to ../Plone/acl_users/ldap/acl_users/manage_main
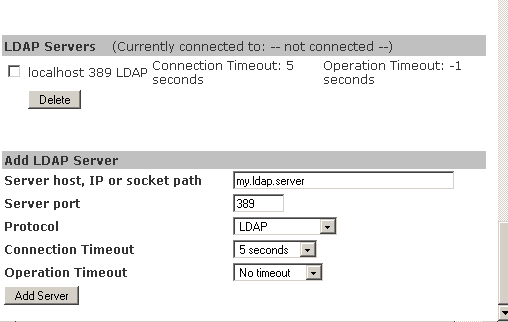
Complete the information to add an LDAP server and click Add Server.
Assuming that the LDAP server is correctly added, you can view LDAP information in the ZMI and even create LDAP accounts of your own (assuming that the service user has the right permissions).
It's also possible to map a Plone role (like Editor/Reviewer/Contributor, etc) to a LDAP group. The process is roughly the same as that for Active Directory.
Verify that the LDAP connection works correctly.
ADD LDAP group inside the ZMI
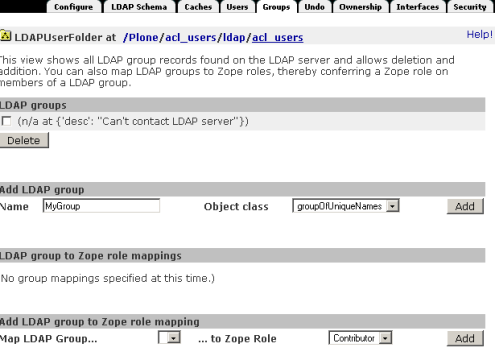
Click Add. If successful, the new LDAP group will appear underneath the dropdown box beside Map LDAP Group.
From the Map LDAP Group dropdown box on the same page, choose the new group.
Choose the workflow you want for this group on the To Zope Role dropdown box.
Enfold Server, no Enfold Proxy
It is possible to configure another proxying server (such as Squid) instead of Enfold Proxy to work with Enfold Server. If you use Squid, you may use any authentication profile except one that includes the phrase Trusted Proxy in the name.
Note: Enfold Server's performance is best when you use a caching server like Enfold Proxy or Squid.
Enfold Server + Apache
Although Enfold Server is commonly deployed with IIS + Enfold Proxy, it is certainly possible to use Apache for Windows instead. If you did that, you would need to proxy the URLs with the mod_proxy module or use Virtual Host Monster (VHM) in the Zope Management interface to map the domain.
Another Apache module, mod_ntlm, even allows Apache to handle NTLM authentication with Active Directory. Configuring this might take some time.
Authenticating Users inside the domain and outside the domain
Suppose a company's website has to serve users who are members of the company's domain and users who are not. How do you do that?
Or to restate the question: can you manage users both in Active Directory and the Plone control panel?
The short answer is: if you need users who cannot be domain members, it's probably easier to do cookie-based login for everybody. Alternately, look at your requirements; it is really necessary that some users not exist in Active Directory? (perhaps a user could use VPN to log in remotely?)
One solution is to use a Trusted Proxy authentication profile and two different IIS sites on two different IP addresses with different EP proxy definitions.
If you use Enfold Proxy, you could set up two proxy definitions, each with a different IIS site. (In Enfold Server you would need to use an authentication profile containing the words with Trusted Proxy ).
- The first proxy definition could point to http://intranet.mydomain.com, and for the IIS site, you'd select the Security tab and make sure for Integrated Windows authentication is checked and the box for Anonymous Web login is unchecked.
- The second proxy definition (on the second IIS located on a separate IP address) could point to http://www.mydomain.com. For this IIS site, you'd have to make sure that Integrated Windows authentication is unchecked and the box for Anonymous Web login is checked. This is the opposite of the first proxy definition.
For the first proxy definition, Intranet domain users will be able to sign on automatically (i.e., with NTLM authentication). For the second proxy definition, NTLM authentication will not be possible for domain users. Both external users and domain users will need to login using cookie-authentication.
Any authentication profiles that contain the phrase "with Trusted Proxy" is a mixed profile (i.e., one which can accommodate both NTLM authentication and cookie-based authentication). When a mixed profile is set, IIS will try to authenticate using NTLM; if that fails, it will prompt the user for a password.
But when you use a mixed profile, you can only name one IP address as a trusted proxy. Because the second proxy definition cannot use NTLM, its corresponding IIS site must exist on a separate IP address. If both IIS sites are on the same machine, this configuration will not work. You need to specify one IP address for each server and then specify this IP using a ZMI form. (The configuration menu appears under the Trusted Proxies Configuration options in authentication profiles.