Readying the Server
Note: This information is mainly useful for system administrators. For most users, this will already be set up for you. However, users will be unable to use Enfold Desktop until the server is readied in the way described here.
Installing the Server Component on the Plone Server
Before users can use Enfold Desktop on a Windows PC, the Plone site needs to support this feature. To do this, you will need to download a bundle of Plone products called Server Component and put them into the Products directory.
- Download the Server Component. http://www.enfoldsystems.com/software/desktop . Currently there are 2 versions, depending on which Python version you are running on your server machine. Most Plone 3x versions run Python 2.4 and would use the 2.4 Server Component. After you unzip the product, you need to put it inside the appropriate Products directory in your Plone installation. Note: Enfold Server already includes the bundle of products, so you don't need to download it separately. On the other hand, if your version of Plone or Enfold Server is fairly old (i.e., more than 2 years old), you may choose to upgrade the Server Components. Read below for instructions about how to do this.
- Unzip the Server Component zip file. You will see 10 directories which are separate Plone products. 4 of them are specific to Enfold (ShellEx Server, Enfold Tools, Plone Lock Manager, External Editor). 6 are general products which you might already have in your Products directory on your Zope machine.
- Copy all of these directories into your Products directory. Note: Enfold recommends that you overwrite the general products already in the products directory with the versions included with the Server Component bundle. Although using more up-to-date versions than the ones provided in the bundle doesn't usually cause problems, the versions bundled in the Server Component have been tested with one another and are less likely to cause problems.
- Restart Zope. (You can do this by going to the Zope Management Interface --> Control Panel -- Restart).
- Login to the Plone site as someone with administrative privileges. Go to Plone Site Setup, Add/Remove Products. #. Go to Plone Site Setup --> Add/Remove Products. In the list of Products Available for Install, check all of the new products included with Server Components and press Install.
- Verify that Enfold Desktop (Server Component) is on the column of installed products. If not, check the box for Enfold Desktop (Server Component) and install it.
- The Server Component will be successfully installed when in Plone Site Setup you see a menu in Plone Site Setup for Enfold Desktop.
Another sign that Enfold Desktop (Server Component) is successfully installed is that you will see a Edit Using Enfold Desktop link on most Plone pages. See below for how to disable this.

Activating the Desktop license
See also: License FAQ
If you are purchasing a site license (which includes paid support), you will receive a file that needs to be dropped into your Enfold Server installation. Note: the process for activating the license is the same regardless of whether you installed the Server Component on a Linux machine or a Windows machine.
You can install this license file in any of the following places on your Plone server:
- INSTANCE_HOME/etc/license (the preferred location)
- Products/EnfoldTools/LicenseManager
- Products/LicenseManager
- enfold/runtime
Note: You need to put the license on the Server machine, not on the machine of individual users. Once the license is installed, the banner will be removed on a user's machine the next time he or she restarts Windows.
How do I know if the license is properly installed? There are two different ways:
- If the Plone Manager/Administrator goes to Plone Site Setup and clicks the Enfold Desktop configuration menu (it's under the Add On Product Configuration section), it will indicate whether the license has been recognized.
- Ordinary users of Enfold Desktop will notice that the banner will be removed on future start ups.
Upgrading the Server Component
In general Enfold Desktop is designed with backward compatibility in mind, so Enfold Desktop should still work with older Server Components on the Plone server. However, the latest version of Server Component fixes bugs that could potentially affect performance for people using Desktop. For this reason, Enfold recommends that older Plone sites upgrade to the latest Server Component version. Server component is installed and uninstalled like a normal Plone product, but it does require a restart of Zope (as would be expected with any product upgrade).
To upgrade:
- Download and unzip the latest Server Component file. Once unzipped, it should consist of 10 different directories.
- Find the Products directory on your website. The path should look something like this C:\Program Files\Enfold Server\Products or \home\rsmith\webapps\Zope-2.10.5-final.instance\Products
- Using ftp, go to the Products directory and upload all of the directories. Your FTP client may ask if you wish to overwrite all. Say yes.
- Verify that all the files have been successfully uploaded. For example, you can compare your FTP logs, or right-click on a directory to see if the number of files in your unzipped files equal the number on your Plone site.
- Restart zope. You can do this from the ZMI (go to Control Panel) or by using a terminal command. If you are running Enfold Server, you can restart from the Encontrol configuration utility.
- Go to your Plone URl and verify that your main page still works.
- Go to Plone Site Setup --> Add/Remove Products. In the list of Products Available for Install, check all of the new products included with Server Components and press Install.
- Verify that the product Enfold Desktop (Server Components) is listed in the Add/Remove products list. Check this box and save.
The server component is successfully installed when you can see it under the Installed Products column on Add/Remove products. You should also see a button for configuring Enfold Desktop. If you click on this link, you will see several global options that apply to all users who edit Plone content with Enfold Desktop.
Configuring Global Options for Enfold Desktop
There are global options which the system administrator can set or users who connect to Enfold Desktop. Generally, the default options are fine. More information about the Enfold Desktop global configuration settings is at http://www.enfoldsystems.com/software/server/docs/4.0/desktop.html .
Adding/Removing the Desktop link on Plone pages
See also: Starting an Edit session from your web browser
After a user logs in, he or she will probably notice a link on the bottom of every page that says View in Enfold Desktop. If you have installed Enfold Desktop on your local machine, pressing this link will cause the file corresponding to this specific web page to load in your default editor application on your machine.
However, this link can easily be removed by the System Administrator.
-
Go into the Zope Management Interface (ZMI) via Plone Site Setup.
-
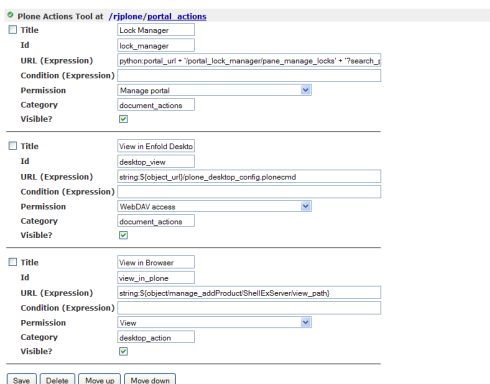
Go to Portal Actions. (The path will usually be http://yourdomain.com/Plone/portal_actions/). Click the Actions tab.
-
Find the entry with the title View in Enfold Desktop.
-
Uncheck the Visible property.
-
Exit the ZMI.