Linking Plone with WWW
Linking Plone with WWW
Linking Plone with WWW
Enfold Proxy (EP) simplifies the process of mapping Plone or Zope sites to hosts or domains in Internet Information Services (IIS). To link Plone with a website, you must follow four basic steps.
- Make sure that a host or domain is configured correctly in IIS and running. (See below)
- Make sure your IIS Host Resolves Correctly. (See Verifying that your IIS Host resolves correctly below)
- Make sure Plone is running correctly. (See below)
- Create a proxy definition in Enfold Proxy that connects the Zope client(s) with an IIS website. (See creating a proxy definition).
Having problems? Check the troubleshooting checklist or the common tasks in Enfold Proxy or the FAQ.
Configuring Your First IIS Host
The first time IIS will be used, it will have something called Default Web Site. You could rename this IIS site (by right clicking and selecting Rename) or even create a new IIS site with a more distinctive name. But for this example, we shall simply leave the default name as it is and simply configure it to handle the host http://www.originalfunsite.com .
-
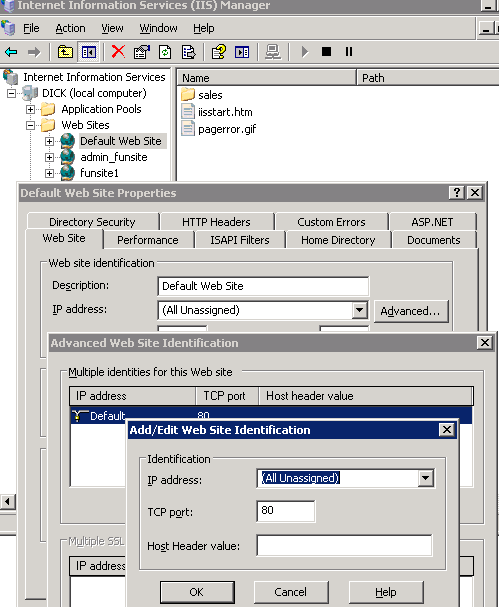
Open IIS and right click Default Web Site. Choose Properties.
-
Go to the Website Tab. Click Advanced.

-
Choose Add/Edit Web Site Identification. Fill in the fields for port number, host header values and IP Address.
Port Number: 80 Host Header values: www.originalfunsite.com IP Address: All Unassigned
-
On the first IIS site, you might notice another website identification already present on this list (with the values of: Default, 80, no host specified). From a security point of view, you might want to remove this listing and include only one row with the values indicated above. But you can keep it if you wish www.originalfunsite.com to receive all unspecified host requests to port 80. In general though, to minimize the possibility of port conflicts, you should specify only one host header per IIS site.
-
Next, you need to verify that this IIS host resolves correctly in your browser.
Important Note: If your version of IIS doesn't allow you to create multiple IIS sites and you need to configure multiple domains, you will need to do this differently. See Multiple Domains with only one IIS site .
Verifying that your IIS Host resolves correctly
Before you can add a proxy definition, you need to make sure you have a host or domain and that your machine is configured to resolve it properly inside your browser. Depending on your environment, you can accomplish this in one of two ways:
- Configure your DNS Server(s) to resolve www.originalfunsite.com. You may have to contact your site administrator to do this. To verify that your DNS server can correctly resolve this host, open a command window and type nslookup www.originalfunsite.com.
- (For testing purposes only) If you don't have easy access to a DNS Server, you can fool your local machine into thinking that the local machine is the correct name resolution for www.originalfunsite.com. Edit this file on your test machine: C:\WINDOWS\system32\drivers\etc\hosts (You will need to be administrator). If IIS is on 192.168.1.150, add this line:
192.168.1.150       www.originalfunsite.com
        (if your browser is on a different machine)
 or
127.0.0.1       www.originalfunsite.com
        (if your browser is on the same machine
   as Plone  and Proxy).
After completing either A. or B., open your browser to www.originalfunsite.com. If you cannot access anything, you may need to restart the IIS site (Right click Default Web Site --> Stop, and right click Default Web Site again and choose Start). If it still does not work, verify that the directory path is correct and that IIS has permission to read it. (Generally, C:\Inetpub\wwwroot should work, or any directory created underneath that). You might need to create a sample index.html file inside this directory to view.
Tip: If you are still having trouble viewing a web page within IIS, go to IIS, right click on the IIS on the left panel and select Properties. Select Home Properties Tab and check Directory Browsing. (You can turn this on when testing, but keep this setting switched off again for a real site). If you still don't see a directory index page, that means IIS doesn't have the right file/directory permissions to access the home directory. Consult your IIS documentation for how to fix that.
After verifying that you can test a domain in the browser, you can create a proxy definition in Enfold Proxy .
Make sure Plone is running correctly
Before you can create a proxy definition in Enfold Proxy , you must have at least Zope client is running in Plone.
Before you can link a Plone site to a domain, you must to use the Zope Management Interface(ZMI) to create a new Plone site.
For information about how to start/restart Zope or Plone, check the documentation for Plone.
Mainly, to verify that Zope/Plone is serving web pages, try accessing these URLs in the browser:
http://localhost:8080
     or
http://192.168.1.150:8080
     or
http://192.168.1.150:8080/plone/
This last URL works only if you have already set up your Plone site. If you can access the URL via the management port (which in this case is 8080), that means that Plone is running correctly. The next step to do is to create a proxy definition in Enfold Proxy.
To avoid port conflicts when using Enfold Proxy, you need to make sure that the HTTP Port 80 is disabled for the Zope client in Plone. Typically the port settings should look like this: HTTP Port 80 (disabled), Management Port 8080 (Enabled), FTP Port 21 (Disabled), Webdav Port 8280 (Enabled), ZEO Server: localhost, port 9999.